Rigging a character
well i started with a 3d model made in wings 3d .After checking the model has no errors we start the rigging process.
We'll follow this order for the rigging
a) Legs IK FK Bind
b)Arms IK FK Bind
c)Spine strechy spine
d)head
e) master control
f) Bind
g)weightpainting
LEGS
First for the legs we will start doing placing the joints. The first joint will be located in the hip then knee/ankle/ball/toe. Then you should orient the joints and check its rotations . Afterwwrds we will start with the IK.
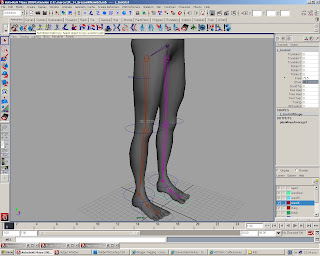
We'll use the ik handle tool located in the animation tab shelf. We will choose the RP solver in the tool menu .We will use it from the hip joint to the ankle joint. Then we will use that same tool but with Sc solver option instead of RP(rotate plane) from the ankle to the ball joint and from the ball joint to the toe joint.We also have to do a pole vector fix so the knee dont break.
next we should make a controler for the leg ik and group it.Then we put some new atribbutes on the controller for certain neded motion by the leg.Lift heel > main ik handle group pivot to the ball .we need to put the other ik handles ( the ones for the toe and the ball) nad put them on a group too . Toe Tap> ik handles group pivot to the ball .This tow groups we made we put them in another group.Stand Tip / Toe pivot both have the pivot on the toe joint. FInally we make a new group from this two past groups we made(Heel Pivot) . Then we put this groups as childs of the controller for the arm.

The we select the set driven key option in the animate tab and put the controller as the driver and we use the groups as driven for each attribute.
FK
This is much more simple we justa have to maske a controller for each joint . Its better if u create it then group it . Then you can grab the joint and select the group and parent constrain it without maintain offset.After you have the controller next to the joint you can delete the parent constraint in the hypergraph panel.Then you orient constraint ( with maintain offset on ) each controller with its correspondent joint.
IKFK switch
This is very easy but a little repetitive so have to pay attention you dont miss anything. The idea is to grab each joint in the ik and orient contraint it to its similar bind joint. Then u do the same with the fK.


After this is done you have to open the set driven key menu and load the controller or whatever you used to put the ikfk switch attand put it as the driver.
Then load each of the orient contraints in the bind and key them correspondly. EX: IKFK> 0 equals ikjoint: 1 fkjointconstraint : 0 IKFK> 10 equals ikjointcontraint: 0 fkjointconraint: 1 and you do that in the menu with each contraint .
note: if you want to make stretchy legs you can watch in art of rigging 1 by digital tutors a very good explanation on how to make a stretchy leg and a stretchy joint chain. Also it has a script that'll do it for you but u loose the fun in making it XD.
Arm
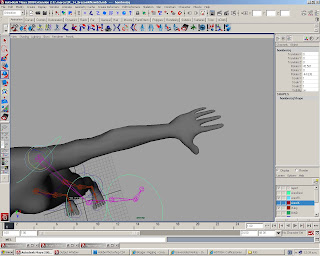
We create a joint for each of the parts of the arm but in the middle of the elbow and wrist joint we have to put an extra joint so it doesnt break with the ik. We do this by selectin the elbow joint and duplicating it and putting it in both the middle and the wrist joint. then we un parent it and parent it again.
We then make two more copies of the joint chain ( FK and BIND)
Ok we make an ik handle from the shoulder joint to the middle wrist joint.This beacuase if we dont do this it will break. WEw have to put the Modify/ Evaluate Nodes/ Ignore All . Then we change th ik handle and effector pivot in the wrist joint. Then we put evaluate nodes on again.We can now make a controller for the ik .

Then in the fk joint chain we just make controllers like we did with the leg and orient contrain them. we also amke a controller for the elbow and use a pole vector constraint.
Then for the switch it works the same way than with the legs.
Spine
First we create a joint chain from the pelvis (not conmected yet.) to before the neck as u see in the picture . Also its importan to check the rotations on the joints so they arre all facing correctly.


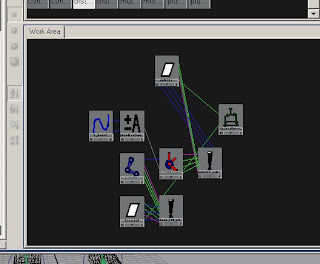
Then we use a ik spline tool from one of the joints before the top joint of the chain to the base joint. This will create a curve in which we will then add clusters to each of the control vertexes.We have to use a mel expression on the ik spline attribute TWIST as shown in the picture .
Ok its time to make the controllers.One for the base ctrl (IK) and one at the top. We take the base control and make a parent contrain to each of the two. We do the same with the top clusters but with the top ctrl. For the middle cluster we make something different. We grab the base ctrl and parent it to the middle cluster and then we do the same with the top ctrl. This will make a double influence on the cluster creating some balance in the movement.

We need to makenow the Fk joints which we can make from the base to the top using c to snap the joints to the curve.we make two more ctrls which will only have rotation purposes so we make orient contraints to the fk joints.
We make another control in the hip to control the rest of the controls.This conrtol will be the fk base Ctrl.
Head and other issues.
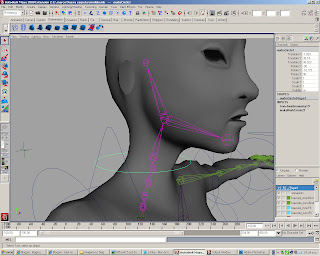
For the head joints we part from the last joint of the spine to and make 1 joint for the neck the jaw and the head * this one at the top) then we make a controller for the neck and one for the Head
Now we are almost ready for the bind,we just need to get everything in order and make a new control , The world .This will control all the other controllers and let us move our character around the scene without any other particular movement. First we need to parent the ik and fk joint chains in the legs to pelvis.Then we grab the FK ctrl of the spine and parent constrain it to the pelvis. Then we parent the ik and fk joint chain of the arms to the clavicle joint. We then parent constraint the controller to the top fk control of the spine. The idea is to group the controls and parent them to the world controller.
We also can make a control for the fingers and make some attributes like we did with the leg ctrl . This could be one controlling a fist pose and a expand pose and a relax pose if needed. Also it could be useful if it has a attribute for each of the fingers.
Bind
We select all the joints in the hypergraph panel and then select the geometry of our model and select bind> smooth bind. Now we have our joints inserted in the geomtry affecting it. If we try to move it its gonna break the geometry horrible. What we need to do is a weightpainting which is stablishing the amount of influence each joint has on a certain part of the geometry.
Weight Painting
We paint this influences with the pain weights tool found in the animation shelf .
For it to work you have to select the geometry and and then the told . You'll see everything black. You can use your rmb in a joint and youll see the option paint weights. Its one of the parts in rigging you should put some nice music while you do this cause it causes a lot of stress and can be very problematic. I recommend you save a lot your proyect and when u see things are not going very well better start from a previous scene .The most important thing is having patience and being careful and cheking everything is smoothed correctly so the joints control the right part of the geometry.Also its useful to make keys with the controllers and check the movement while you paint the weights.


now we have a rigged model we can use!

